
Event Badge Sizes: How to Choose the right size for Your Conference
Quick summary: The most common event badge sizes are 3" × 4", 4" × 6", and 2.25" × 3.5". A 3" × 4" badge works well for many business conferences, while a 4" × 6" badge is usually better when names must be readable from farther away or the design needs room for QR codes, sponsor logos, attendee categories, and access information. Smaller badges are better suited to meetings and simple introductions. The right choice ultimately depends on how the badge will be used, not simply how it looks on a screen.
An event badge begins as a small design decision, but it quickly becomes part of the attendee experience. It influences how easily people introduce themselves, how quickly staff can identify a VIP, whether an exhibitor can scan a lead, and whether the registration desk can process a line without unnecessary delays.
This is why choosing between different event badge sizes should happen before the design is finalized. A layout that looks balanced on a laptop may become difficult to read when printed at 3" × 4". A QR code that worked in a digital preview may fail when it is reduced, placed behind a reflective holder, or partly covered by a clip. Conversely, a large credential may feel excessive at an executive meeting where the badge only needs to show the attendee’s name and company.
The objective is not to choose the largest badge available. It is to choose the smallest badge that can perform every job expected of it without sacrificing readability, scanning reliability, comfort, or event branding.
As Amanda Collett, owner and CEO of ConferenceBadge.com, puts it:
“A badge should make an introduction easier before it tries to do anything else. If guests have to lean forward to read a name, the badge has already missed its most important job.”
Common Event Badge Sizes
There is no single universal size for conference badges. Instead, the event industry has settled around several practical dimensions that work with commonly available printers, lanyards, badge holders, and paper formats.
| Badge size | Approximate metric size | Best suited to |
|---|---|---|
| 2.25" × 3.5" | 57 × 89 mm | Small meetings, adhesive tags and business-card-style badges |
| 3" × 4" | 76 × 102 mm | Standard conferences, corporate events and seminars |
| 4" × 6" | 102 × 152 mm | Large conferences, trade shows and expos |
| 3.5" × 5.5" | 89 × 140 mm | Premium badges and networking events |
| 4" × 3" | 102 × 76 mm | Horizontal conference badges and holder inserts |
| 6" × 4" | 152 × 102 mm | Large horizontal credentials, staff passes and access badges |
These dimensions may describe the printed insert, the finished badge, or the space inside a holder. Those are not always the same measurement. A holder advertised for a 4" × 6" badge will usually have outer dimensions slightly larger than 4" × 6", while its actual pocket may fit an insert close to that size.
Always design around the insert dimensions supplied by the printer or holder manufacturer. Designing around the holder’s outer dimensions is one of the easiest ways to create a badge that must be trimmed, scaled down, or reprinted.
ConferenceBadge.com supports common Avery formats as well as custom PDF formats. Its current product range also includes 4.25" × 3.67" and 6" × 4" Cardboard Badges, 4" × 3" and 6" × 4" printed inserts with holders, and 6" × 4" laminated PVC options. Current formats and product specifications can be seen on our products page.
What Is the Standard Event Badge Size?

For many conferences and business events, 3" × 4" is treated as a common standard event badge size. It gives planners enough real estate for a prominent name, company, job title, logo, attendee type, and modest QR code without producing an oversized credential.
The word “standard,” however, can be misleading. A standard name badge for a 40-person leadership meeting is not necessarily the right badge for a 5,000-person exhibition. A smaller meeting badge may only need a name and organization. A trade show credential might need to distinguish attendees, exhibitors, media, speakers, sponsors, staff, and contractors from several feet away.
For networking-heavy events, 4" × 6" is often the more forgiving format. Its additional vertical space lets designers increase the font used for the attendee’s name while preserving room for a company, role, QR code, sponsor mark, and access category.
ConferenceBadge.com recommends 3" × 4" as a practical general format in its badge design guidance, while its current printed products include larger formats intended for stronger visibility. That distinction reflects the larger lesson: a standard is a starting point, not a substitute for understanding the event.
Why Badge Size Matters Across the Attendee Journey
Badge selection is often treated as a production task that happens shortly before printing. In reality, it affects several stages of the customer journey.
Before the event, the badge dimensions determine what the design team can include without reducing legibility. During registration, the format affects printing speed, holder assembly, sorting, and the handling of walk-in guests. Inside the venue, it shapes networking, wayfinding, lead retrieval, and access control. After the event, badge scanning data may feed attendance reporting, exhibitor follow-up, and post event survey questions.
A poorly chosen size creates friction at several of these moments. Registration staff may struggle to fit unexpected job titles into a rigid template. Guests may turn badges around because the holder hangs badly. Exhibitors may repeatedly ask people to hold a QR code flat. Security teams may have difficulty distinguishing vip badges from general admission credentials.
A better size gives each piece of information room to perform its intended function.
“The decision should begin with what an attendee, staff member, or exhibitor needs to recognize in two seconds,” says Amanda Collett. “Once that is clear, the right dimensions usually become much easier to choose.”
Best Badge Size by Event Type
The number of attendees matters, but it is not the only factor. The physical environment, networking expectations, security model, and amount of variable data can be more important than the guest count.
Conference Badge Sizes
Recommended sizes: 3" × 4" or 4" × 6"
Most professional conferences need a badge to show at least a name, company, title, attendee type, and event identity. Many also include qr codes, barcodes, meal preferences, session access, or sponsor information.
A 3" × 4" badge is usually sufficient when the content is restrained. It works particularly well for a one-day conference where attendees remain in smaller rooms and the badge only needs to support introductions.
A 4" × 6" format becomes more useful when networking is central to the event. Imagine a university conference that brings together deans, faculty members, administrators, vendors, and graduate students. A small badge may technically fit every required field, but long institutional names and academic job titles will force the typography to shrink. Increasing the badge to 4" × 6" allows the first name to remain prominent while the institution and role stay legible.
The lesson is not that every academic or corporate conference needs a large badge. It is that the design must accommodate the longest realistic data, rather than the shortest sample record used in the template.
We have these exact sizes:
Trade Show and Expo Badge Sizes

Recommended sizes: 4" × 6" or 6" × 4"
Trade shows are visually crowded and registration / lead collection can be difficult. Attendees move between booths, exhibitor staff need to recognize prospects quickly, and event personnel must distinguish between several credential classes.
Larger event badges work because they reduce the time needed to interpret a credential. A 4" × 6" portrait badge can give the attendee’s name priority while leaving a dedicated area for a scannable code. A 6" × 4" landscape format can provide room for bold exhibitor or staff labels, particularly when the badge functions partly as an access pass.
Consider a regional technology expo that originally used a 3" × 4" badge for everyone. The design included a first name, last name, company, title, sponsor logo, attendee category, and QR code. Every element fit, but none of them stood out. Exhibitors frequently looked down at badges for several seconds before beginning a conversation.
The following year, the organizer moved to a 4" × 6" badge and reserved the lower section for the QR code and attendee category. The change did not add more information. It created a clearer hierarchy. Names became easier to recognize, scanners had a consistent target area, and attendee categories could be seen in busy aisles.
Networking Event Badge Sizes

Recommended sizes: 3.5" × 5.5" or 4" × 6"
The central purpose of a networking badge is to reduce the social effort required to begin a conversation. That makes readability more important than visual density.
A larger portrait badge usually works well because it provides vertical separation between the name, company, job title, and any conversation prompt. The first name should be the dominant element. The company and title can remain secondary without becoming too small to read.
At networking events, smaller plastic badges with an ID-card appearance may look polished but perform poorly. Participants often need to step closer or stare at another person’s chest to read them. That creates exactly the kind of awkwardness the badge is meant to remove.
Corporate Event Badge Sizes
Recommended sizes: 3" × 4" or 2.25" × 3.5"
Corporate event use cases vary widely. An internal training workshop may only need names and departments. A client summit may require titles, companies, QR codes, and event branding. A shareholder meeting may prioritize security and access control over networking.
A 2.25" × 3.5" badge can work for a formal executive meeting where minimalism is intentional and everyone will spend most of the day in one conference room layout. A 3" × 4" badge provides more flexibility for a multi-session corporate event where participants will move between rooms and meet colleagues from other offices.
The deciding factor is whether the badge is primarily an introduction tool, an identity credential, or both.
Festival, Staff and VIP Credential Sizes
Recommended sizes: 4" × 6", 6" × 4", or custom sizes
Festival and venue credentials often carry more operational information than conventional event name badges. They may display a staff role, access zones, valid dates, meal privileges, production areas, or emergency responsibilities.
These badges benefit from bold color coding and large category labels. A security employee should not have to read a paragraph to determine whether someone can enter a restricted area.
For example, a multi-day festival might use the same dimensions for attendees, artists, vendors, staff, and media while changing the color band and access label for each group. Keeping the badge dimensions consistent simplifies printing and lanyard procurement, while the visual system makes each role distinct.
There are situations in which custom sizes are justified. A backstage pass, tour credential, or multi-zone festival badge may need additional real estate. The tradeoff is that custom formats can require special stock, different holders, more testing, and higher production costs.
Vertical vs. Horizontal Event Badges
Orientation changes how information is perceived even when the total surface area remains similar.
| Format | Best suited to | Advantages | Considerations |
|---|---|---|---|
| Portrait or vertical | Conferences, networking events and trade shows | Strong name hierarchy, natural space for QR codes and effective use with lanyards | Requires a vertical holder or properly positioned slot |
| Landscape or horizontal | Staff credentials, corporate events and access passes | Familiar ID-card feel and accommodates wide logos and long company names | Provides less vertical room for stacked content and large names |
A portrait badge is often better for a conference because names, companies, titles, and QR codes naturally form a vertical hierarchy. The first name can occupy the upper half, while operational information remains below it.
A landscape badge works well when the event has a wide logo or when the credential must resemble an employee ID. It can also be effective for staff passes that need a large horizontal label such as SECURITY, EXHIBITOR, SPEAKER, or PRODUCTION.
Orientation also changes how the badge hangs. A landscape credential with only one central lanyard slot may rotate more readily. Dual attachment points can help keep it facing forward, but they require compatible lanyards. Portrait badges tend to hang more naturally from a single central attachment.
When planners evaluate a portrait against landscape, they should look beyond the design file and test how the badge behaves while someone is walking, sitting, carrying a bag, or wearing a jacket.
Event Badge Holder Sizes
A badge and its holder should be treated as a system. The paper may be 3" × 4", but the holder will usually be slightly larger because it needs seams, an opening, and space for a clip or lanyard slot.
Several measurements need to be confirmed:
The printable insert width and height
The holder’s internal pocket dimensions
The holder’s outer dimensions
The position of the slot, pin, or clip
Whether the opening is at the top or side
The required portrait or landscape orientation
The maximum insert thickness
Compatibility with single-hook or dual-hook lanyards
A 3" × 4" badge generally needs a holder designed for a 3" × 4" insert. It should not be designed from the holder’s outside measurement.
This distinction becomes particularly important with Inserts holders badges, where the insert must slide into a reusable vinyl or plastic sleeve. A badge that is even slightly too large may buckle. One that is too small can move inside the holder and appear crooked.
Planners should also inspect how much of the insert is obscured by the holder seam. Important text, barcodes, and logos should remain comfortably inside the visible area.
ConferenceBadge.com offers printed inserts that are cut and loaded into compatible holders, which removes part of this matching process. Organizations producing their own PDF badges should verify their avery or third-party holder specifications before building the template.
Badge Size for QR Codes and Barcodes
QR codes for events can support check-in, lead retrieval, session access, attendee directories, surveys, schedules, and contact exchange. Their value, however, depends on whether they can be scanned quickly under real event conditions.
There is no universally reliable QR code size for every possible code because scanning performance depends on several factors:
The amount of data encoded
The code’s error-correction level
Print quality
Contrast
Scanning distance
Camera or scanner quality
Lighting
Badge material
Surface glare
Whether the badge is flat or moving
For many conference applications, a QR code measuring approximately 1" × 1" provides a sensible starting point. It should be surrounded by an empty quiet zone and printed with strong contrast. EventMobi similarly recommends starting around 1" × 1" for conference badge codes and testing the result on the actual printer and stock.
A 3" × 4" attendee badge can support a QR code, but the remaining content must be disciplined. A 4" × 6" badge offers more room to preserve both scanning performance and name readability.
Codes should not be positioned immediately beside the trim line, underneath a lanyard slot, or where a holder seam may cross them. Reflective plastic badges and glossy holders can create glare, so testing should happen with the finished materials rather than an ordinary office printout.
The information encoded also matters. A short unique attendee identifier generally produces a simpler code than embedding a full contact record. The scanning system can use that identifier to retrieve the relevant registration information. This can also reduce the amount of personal data visibly stored in the code.
For lead retrieval, each attendee should receive a unique code generated from the event’s variable data. Repeating a generic event code on every badge may direct people to a schedule or website, but it cannot identify individual attendees.
Barcodes require similar testing. Their width, line density, and orientation must remain compatible with the scanners used at the venue. Whether using barcodes, qr codes, or RFID, the event team should test realistic movement, lighting, distance, and connectivity before the doors open.
Event Badge Design Size Guidelines
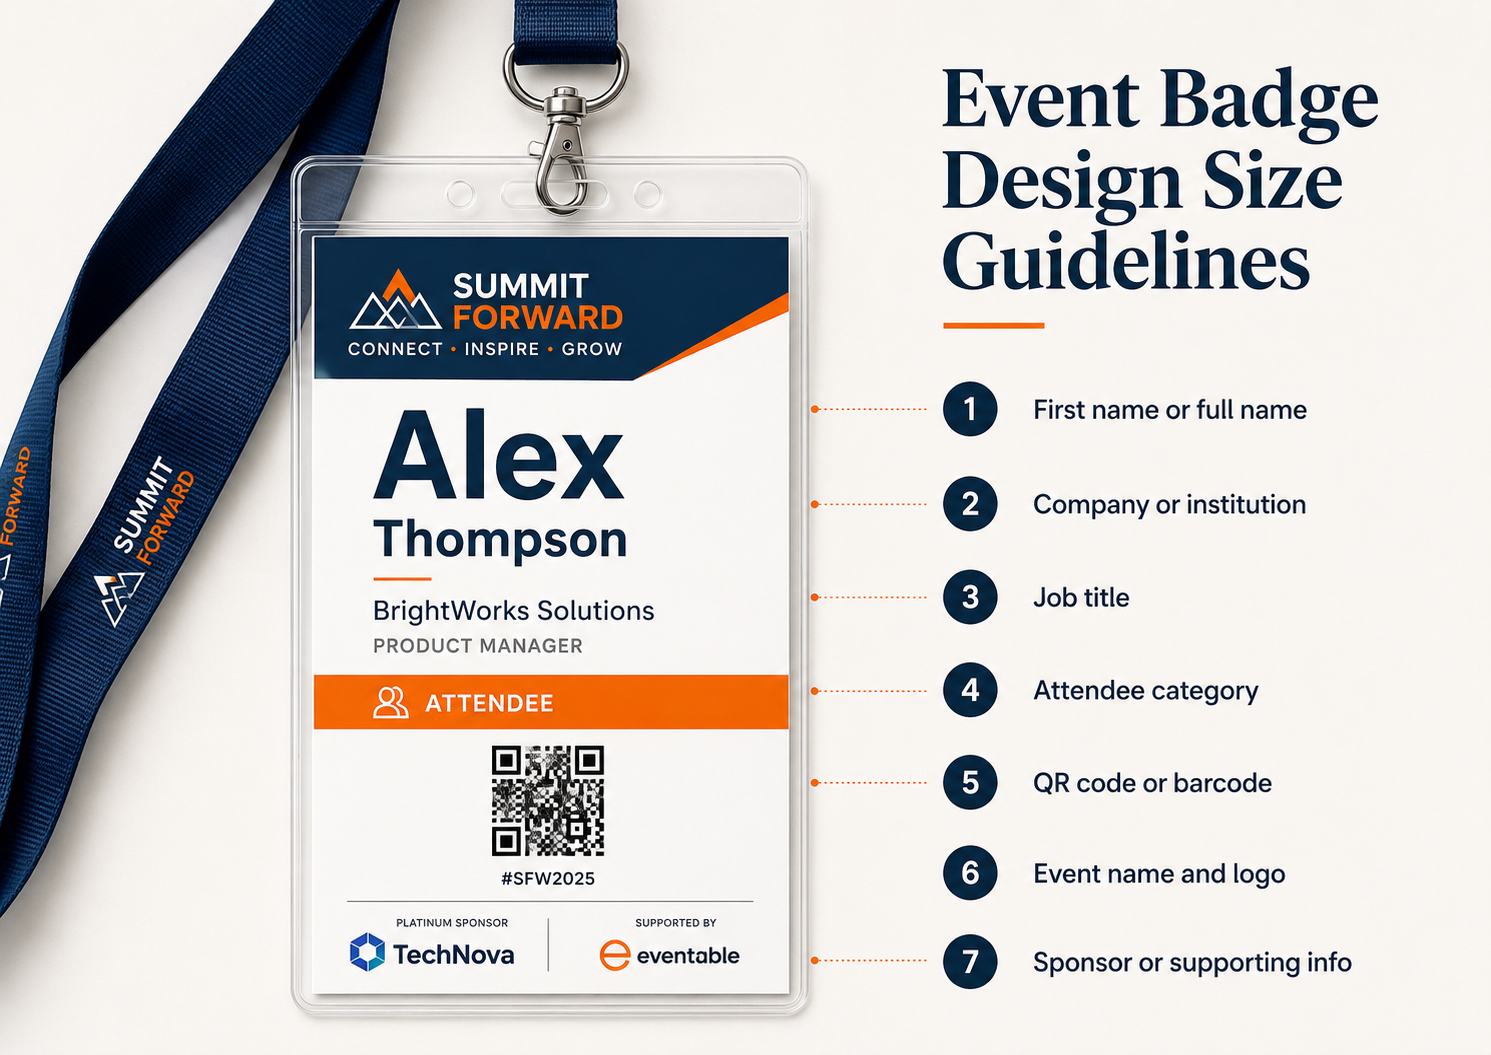
A badge should communicate in layers. The most socially useful information should be understood first, followed by professional context and then operational data.
The first name should normally be the largest text element. At some events, the full name may use one size. At others, enlarging the first name makes introductions more natural. The company and job titles should be smaller but still readable without requiring the other person to lean in.
A practical hierarchy might be:
First name or full name
Company or institution
Job title
Attendee category
QR code or barcode
Event name and logo
Sponsor or supporting information
The exact hierarchy changes by audience. At a university leadership meeting, the institution and academic role may be especially important. At a consumer convention, a preferred name may matter more than an employer. At a real estate conference, company affiliation, market, and professional categories may help attendees identify relevant contacts.
The font event name tag decision should be made at final print size rather than at 200 percent zoom. A simple sans serif font often works well because its letterforms remain clear at different distances. Decorative fonts may support branding in headings, but they can reduce readability when used for names.
There is no universal minimum font size that suits every badge. A name intended to be recognized from several feet away should be substantially larger than supporting text. Long names must be tested because a template that works for “Sam Lee” may fail for an attendee with a longer name, company, and job title.
Strong contrast is equally important. Light gray text on a white background may look refined on a monitor but become difficult to read under conference lighting. Color coding should reinforce the attendee category without reducing text contrast.
White space is not wasted real estate. It separates information and helps the eye find the name quickly. When every available inch is filled with logos, schedules, labels, and fine print, the badge becomes a miniature poster rather than an identification tool.
Sponsors still need meaningful visibility, but sponsor logos should be controlled so they do not compete with the attendee identity. The back of a double-sided badge can provide additional space for a schedule, Wi-Fi details, emergency information, a survey link, or sponsor recognition.
Choosing Badge Materials Alongside Badge Dimensions
Badge dimensions cannot be separated completely from badge materials. A 6" × 4" paper insert behaves differently from a 6" × 4" rigid PVC credential.
Cardstock and Cardboard Badges offer a substantial feel without necessarily requiring a plastic sleeve. ConferenceBadge.com currently offers double-sided 16-point card stock options with rounded corners and lanyard-ready slots. This format can reduce the need for disposable holders while still providing a polished surface for full-color event branding.
Printed paper inserts with badge holders remain useful for multi-day events because the holder protects the badge and may be reused. They can also accommodate agenda cards or supplementary inserts. The operational tradeoff is that inserts must be loaded into holders, unless the printer provides them preassembled.
Plastic badges and laminated PVC badges provide greater resistance to moisture, bending, and repeated handling. They are appropriate for outdoor events, premium credentials, staff passes, and events lasting several days. A typical rigid identification card may be made from approximately 30 mil PVC, which is about 0.030 inches thick. The ISO ID-1 card format used for many professional identity cards measures 85.60 × 53.98 mm, or approximately 3.37" × 2.13"
A 30 mil PVC plastic ID card is durable, but its relatively small real estate limits how much conference information can be displayed. It may work for staff credentials or recurring memberships, but it is rarely the strongest format for a networking-focused conference badge.
Material should therefore be selected according to the badge’s expected lifespan, exposure, required finish, and disposal plan—not simply because one option feels more premium.
Print Setup: Bleed, Safe Area and Resolution
Even a well-sized badge can fail if the artwork is prepared incorrectly.
For raster artwork intended for professional printing, 300 pixels per inch is a common target. Logos should ideally be supplied as vector files so they remain sharp at any scale. Adobe’s print design guidance recommends using correctly sized print-resolution images and identifies 300 PPI as a standard resolution for print graphics.
When artwork extends to the edge, the file usually needs to bleed. A common printer requirement is 0.125" on each side, but the exact amount must be confirmed with the production provider. The University of Minnesota’s printing guidance explains how a 0.125" bleed on all sides adds 0.25" to both the document width and height.
The trim line represents the finished badge dimensions. Background colors and images should extend beyond that line into the bleed. Names, QR codes, sponsor logos, and other important information should remain inside the safe area.
Files should generally be exported as print-ready PDFs, with fonts embedded and the required color profile applied. PDF badges are particularly useful because they preserve layouts more reliably than editable office documents.
Before approving the file, check that:
Raster images are suitable for the final print size
Logos remain sharp
Fonts are embedded or outlined as required
Backgrounds extend through the bleed
Important information remains inside the safe area
QR codes and barcodes are not compressed or distorted
The PDF page size matches the intended badge dimensions
The printer’s required CMYK or color profile settings have been followed
Printer requirements take precedence over generic recommendations. Some on site printing systems are designed around thermal stock and may not use bleed or conventional CMYK artwork at all.
Event Badge Size Examples
A few realistic examples show how format decisions change according to the job the badge must perform.
A 2.25" × 3.5" Simple Meeting Badge
A regional HR team is holding a 25-person planning session. Everyone will remain in the same meeting room, there are no exhibitors, and the badge only needs to show a name and department.
A business-card-style badge is appropriate because distance recognition and scanning are not priorities. The small format supports the formal tone of the meeting without burdening attendees with a large credential.
The design would break down if the organizer added a schedule, several sponsor logos, a QR code, and long job titles. The badge is effective because the content remains deliberately limited.
A 3" × 4" Standard Conference Badge
A professional association is hosting a one-day conference for 350 attendees. Each badge includes a first name, last name, organization, job title, attendee category, and QR code.
The 3" × 4" format is workable, but the organizer must establish rules for long names and titles. Instead of reducing every field until it fits, the design allows long titles to wrap and limits company names to two lines.
This is a common middle-ground format: large enough for most conference requirements, but compact enough to wear comfortably throughout the day.
A 4" × 6" Large Networking Badge
A national sales conference is designed around peer introductions and partner meetings. The earlier event used small badges that participants repeatedly leaned toward to read.
Moving to 4" × 6" gives the first name significantly more space. The company and title remain visible, while the lower section contains a lead-retrieval code.
The important change is not simply that the badge becomes larger. The additional real estate is used to strengthen the information hierarchy rather than to add more content.
A 6" × 4" Horizontal Staff Credential
A large expo needs staff members to be recognized quickly by attendees and venue personnel. The credential uses a landscape layout with a bold STAFF label, the person’s name, department, access level, and barcode.
The wide design accommodates the event logo and category label without crowding the employee information. Dual lanyard attachments help keep the badge facing forward.
A Badge With a Sponsor Logo and Attendee Type
An industry summit has several sponsor tiers and five attendee categories. Earlier badge designs used separate logo placements and colors for every group, creating a complicated production process.
The revised system uses one badge size and template. A controlled sponsor area remains consistent, while a variable color band identifies speakers, sponsors, exhibitors, staff, and general attendees.
This approach demonstrates how one badge size can support several event use cases when the variable system is planned correctly.
Onsite Badge Printing and Last-Minute Registrations

Onsite badge printing changes the operational side of choosing a size. The badge must fit not only the wearer’s needs but also the printer, stock, check-in counter, and software workflow.
A large 4" × 6" badge may support excellent readability, but the planner needs equipment that can reliably produce that format. Some onsite printers only accept proprietary rolls or fixed dimensions. Others can print paper inserts that must then be placed into holders.
For events with frequent walk-ins, registration edits, or late substitutions, onsite badge printing can prevent staff from handwriting DIY name tags or modifying preprinted credentials with stickers. It also allows organizers to correct misspelled names and changed job titles without creating a visibly different badge.
ConferenceBadge.com supports on site printing for last-minute attendees alongside pre printed and shipped options. This gives planners the ability to produce the main attendee list in advance while preserving a consistent badge design for changes at the venue.
The worst outcome is a two-tier visual system in which registered guests receive professional custom event badges while walk-ins receive handwritten labels. The difference may seem minor to the planning team, but it can make late registrants feel like an afterthought.
Badge Integrations and Variable Attendee Data
Badge dimensions should be tested against real registration data before production. This is especially important when information comes through badge integrations, registration platforms, spreadsheets, or ticketing systems.
Variable data may include:
The attendee’s name
Preferred name
Company or institution
Job title
Ticket type
Attendee category
Access level
Meal preference
Unique QR code
Barcode or RFID identifier
The template must account for the longest plausible values. A design team should never test only with short placeholder names such as Jane Doe.
ConferenceBadge.com allows organizers to import an attendee list and map variable data to the badge design. This can include workflows for creating name badges from Excel, producing name badges from Google sheets, importing registration data, or connecting supported registration platforms.
The real advantage of data integration is not simply speed. It reduces manual retyping, which lowers the likelihood of inconsistent spelling, missing titles, duplicate identifiers, and incorrect codes.
However, integration does not remove the need for review. Spreadsheet columns must be mapped correctly, names should be checked for capitalization, and empty fields should not leave awkward gaps in the layout. Name badge print outs and printed test sheets should be reviewed before the full order is released.
How to Choose the Right Event Badge Size
The best decision begins with how the badge will be seen and used.
Choose a larger badge when:
Networking is a central part of the event
Names must be readable from several feet away
The design includes QR codes or barcodes
Sponsor branding must remain visible
Several attendee categories need to be distinguished
The venue is crowded or visually busy
The badge supports access control
Staff must identify roles quickly
Long companies or job titles are common
Choose a smaller badge when:
The event is small, formal, or held in one room
The design only needs a name and company
A minimalist appearance is important
Business-card-style badge holders are already available
The badge is worn for a short period
Portability and material use are priorities
Cost is relevant, but it should not be considered in isolation. A smaller badge may reduce paper or material costs, yet create a weaker experience if attendees cannot read it. A larger badge may cost slightly more while improving introductions, scanning, categorization, and sponsor visibility throughout the event.
Planners should consider the badge alongside the event’s other physical decisions. The conference room layout affects typical viewing distance. Lighting influences contrast and scanning. Lanyards affect orientation. Registration software determines how variable data arrives. Security requirements influence the prominence of access labels.
The right size is therefore the result of the entire operating environment.
Event Badge Size Checklist
Before approving event badge printing, confirm the following:
The final badge dimensions and insert dimensions
The holder’s internal size and orientation
Whether the badge will be portrait or landscape
Lanyard hole, slot, pin, or clip placement
Readability of first and last names at actual print size
Treatment of long names, companies, and titles
QR code or barcode size and quiet area
Sponsor logo placement
Attendee category visibility
Bleed and safe margins
Print-ready PDF settings
Stock, thickness, and holder compatibility
Compatibility with onsite printers
Scanning performance on the finished material
A printed sample before full production
A physical sample is more valuable than another round of screen review. It reveals whether the badge hangs correctly, whether the type is genuinely readable, and whether the code scans through the finished surface.
Common Event Badge Size Mistakes
Designing for the Holder Instead of the Insert
The holder’s outside dimensions are not necessarily the printable dimensions. Artwork designed around the outer measurement may need to be scaled down, changing the text size and margins.
Making the Name Too Small
A badge can contain all the correct information and still fail if the name cannot be read naturally. Event branding should support identification rather than displace it.
Choosing a Badge Too Small for the QR Code
When a code is reduced to make room for additional information, it may become unreliable. Planners should either simplify the content, reduce the encoded data, or choose a larger badge.
Forgetting the Safe Area
Names, logos, and codes positioned too close to the trim can appear unbalanced or be cut during finishing.
Placing Content Under the Lanyard Hole
A lanyard slot or clip can obscure a logo, attendee category, or part of the name. The attachment area should be built into the design from the beginning.
Overcrowding the Layout
Adding schedules, sponsor logos, social handles, websites, session information, access labels, and survey links to the front of one badge makes every element less useful.
Using Low-Resolution Logos
A logo copied from a website may look acceptable on screen but print with visible pixelation. Vector artwork is preferable.
Ignoring Orientation
A portrait design printed for a landscape holder—or a single-slot landscape badge that constantly flips—creates avoidable production and usability problems.
Skipping Scan Testing
Codes should be tested on the production printer, final stock, and holder. A test from a desktop monitor does not recreate glare, motion, print density, or actual scanning distance.
Using the Same Visual Treatment for Every Role
The same physical size can be used across categories, but staff, exhibitors, speakers, and VIPs may need stronger visual differentiation. This can be achieved through color coding, typography, or category bands without creating completely different badge dimensions.
Conference Badge Alternatives and When They Make Sense
Not every gathering requires a traditional lanyard badge. Conference badge alternatives include adhesive labels, magnetic name tags, reusable staff IDs, digital credentials, wristbands, and simple tabletop place cards.
Adhesive DIY name tags can work for short, informal gatherings where access control and durability are not concerns. Magnetic or pinned badges may suit employees who use the same identification repeatedly. Wristbands can be more practical at festivals where access category matters more than networking.
These alternatives have limits. A wristband cannot show a readable professional identity. A small magnetic tag may not support a QR code. A digital credential depends on guests repeatedly opening a phone. Adhesive labels can peel away or damage delicate clothing.
Traditional conference badges remain effective because they combine identification, branding, networking, and operational data in one visible format.
Related Badge Planning Considerations
Badge size connects with several other decisions that should be made as part of the same planning process with the right tools.
The conference room layout influences how far apart participants will stand and how easily names can be read. QR codes for events need to be tested according to the event’s lead-retrieval or check-in workflow. Custom event badges should be designed around real attendee information rather than idealized sample data.
Organizers should also plan how Name badges from Excel and Name badges from Google sheets will be imported, how corrections will be handled, and whether PDF badges will be printed in advance or at the venue. Badge integrations should be confirmed early enough to prevent a last-minute manual data transfer.
After the event, the planning team can use post event survey questions to ask whether badges were comfortable, readable, and useful. Attendee feedback is particularly valuable when the event introduces larger credentials, new badge materials, different holders, or scanning technology.
Frequently Asked Questions
What size are professional badges?
Professional badge sizes depend on their purpose. Conference and event badges commonly range from 3" × 4" to 4" × 6". A rigid professional ID card usually follows the ID-1 format of approximately 3.37" × 2.13". Larger conference formats are generally better when networking, QR codes, sponsor branding, or attendee categories are important.
How big is a 38mm badge?
A 38 mm badge is approximately 1.5 inches in diameter. This measurement usually refers to a circular pin badge rather than a conference name badge. It can display a small logo, message, or category marker, but it is too small to function as a full attendee badge containing a name, company, title, and QR code.
What size is a standard ID badge?
A standard ID card commonly uses the ISO ID-1 or CR80 format, measuring 85.60 × 53.98 mm, or approximately 3.37" × 2.13". It is often produced in 30 mil PVC plastic. This format works well for employee identification, memberships, and recurring access cards, but larger badge sizes are usually better for conference networking.
What are Standard Event Badges?
Standard Event Badges are credentials produced in commonly used formats such as 3" × 4", 4" × 6", or 4" × 3". They typically show the attendee’s name, company, title, event branding, attendee type, and an optional QR code or barcode. There is no single international standard event badge dimension, so the format should be selected according to the event’s requirements.
What size should a conference badge be?
A 3" × 4" badge is appropriate for many conferences. A 4" × 6" badge is often better for large conferences, trade shows, networking events, or credentials containing QR codes, attendee categories, and sponsor branding. The name should remain readable at a natural networking distance.
Does badge size affect price?
Yes. Larger badges generally use more material and may require different stock, holders, shipping space, or printing equipment. Material and finishing choices can have an even greater effect on price than the dimensions alone. Plastic event badges, laminated credentials, RFID components, custom sizes, and preassembled holders may cost more than simple paper inserts or PDF badges.
What sizes do Standard Event Badges come in?
Common sizes include 2.25" × 3.5", 3" × 4", 4" × 3", 3.5" × 5.5", 4" × 6", and 6" × 4". Some providers also offer custom sizes. ConferenceBadge.com currently offers several printed cardboard, holder, PDF, and PVC formats, including 4.25" × 3.67", 4" × 3", and 6" × 4" options.
Can I get samples of the different badge materials?
Sample availability depends on the badge provider, product, location, and order schedule. Ask to compare card stock, paper inserts, holders, laminated PVC, and other badge materials before placing a large order. A physical sample can also reveal differences in thickness, color, glare, durability, slot placement, and scanning performance that are difficult to judge online.
What are the standard name badge dimensions?
Common standard name badge dimensions include 2.25" × 3.5" for a compact business-card-style badge and 3" × 4" for a conference badge. Larger 4" × 6" formats are frequently used when readability and networking are priorities. The dimensions should always be checked against the badge holder’s insert area.
How do I choose the right size for an event badge?
Begin by listing what the badge needs to display and how it will be used. Choose a larger format when names must be read from a distance, codes need to be scanned, multiple attendee categories are required, or the badge supports access control. Choose a smaller format for short meetings with minimal information. Always test a printed sample with the actual lanyard, holder, printer, and scanner.
What is the best size for event name badges?
For most business events, 3" × 4" is a strong general-purpose choice. For networking-focused conferences, expos, and badges containing QR codes, 4" × 6" usually provides better readability and layout flexibility. The best size is the one that keeps the attendee identity prominent while accommodating every essential operational element without overcrowding.